How to convert a Virtual PC 2007 VMC file to work with Hyper-V
Published by marco on
The following article was originally published on the Encodo blogs and is cross-published here.
Windows 8 was made publicly available a few weeks ago. As usual, Microsoft manages to guarantee compatibility with a lot of software, but there are a few tools that will simply no longer run.
One of these is Microsoft’s own Security Essentials product, which has been completely replaced with Windows Defender, which is built right in to Windows 8. So that one’s easy.
Another is Microsoft Virtual PC 2007. It doesn’t run under Windows 8 at all. Neither is the configuration format that it uses directly compatible with any of the other virtualization solutions that do run under Windows 8.
- As of November 2012, VirtualBox is still having some compatibility and speed problems under Windows 8
- VMWare’s runner also doesn’t have an easy upgrade path for Virtual PC images. You have to convert the disk image and somehow recreate the VM configuration file
- Even Microsoft’s own Hyper-V is only available on machines that have hardware support for it and, while the disk image is compatible, the configuration format is completely different
If you’re already a user of Microsoft’s Virtual PC, then it’s likely you’d like to just upgrade to using Hyper-V, if possible. Luckily, Hyper-V is available as an option for Windows 8 Pro and higher. To find out if your machine supports it and to install it, follow the instructions below.
Enable Hyper-V
- Press Windows key+W to search settings
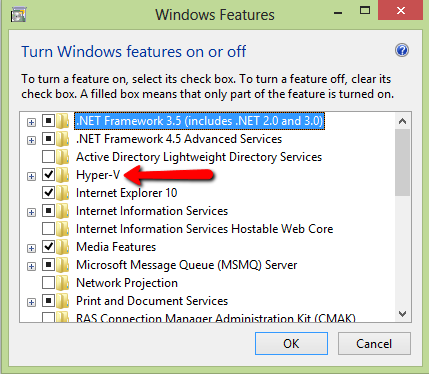
- Type “win fea” and Enter to show the “Turn Windows Features On and Off” window
- If the “Hyper-V” checkbox is already checked, then you’re ready for the next step
- If the “Hyper-V” checkbox is disabled, then you’re out of luck; Hyper-V is not available for your machine and you’ll have to try one of the other virtualization solutions mentioned above
- Otherwise, check the “Hyper-V” checkbox and press “Ok”. You’ll naturally have to reboot for those changes to be applied.
Configure the Hyper-V Switch
Once Hyper-V is enabled and you’ve rebooted, you can startup the Hyper-V Manager and configure it.
- Press the Windows key to show the start screen
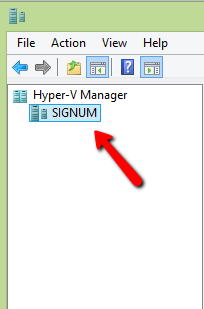
- Type “hyper” and Enter to find and start the “Hyper-V Manager”
- Select your machine in the tree on the left under Hyper-V Manager
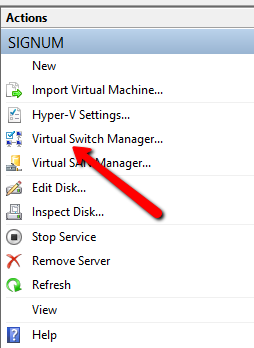
- In the settings for that machine on the right, click “Virtual Switch Manager”
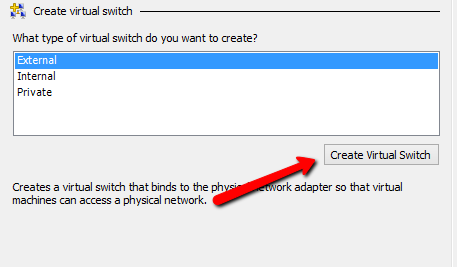
- In that dialog, the “New virtual network switch” node should be selected and you’ll see a list on the right. Select “External” to create a switch that has access to the Internet and press “Create Virtual Switch”
At this point, your Hyper-V server is ready to load your virtual machine and let it access the Internet.
Create a Hyper-V virtual machine from a .vmc file
All of the configuration settings for the Virtual PC virtual machine are stored in a .VMC file. Unfortunately, the Hyper-V manager can’t import these files directly[1]. Luckily, there is a tool, called the VMC to Hyper-V Import Tool, which performs the import in a couple of easy steps.
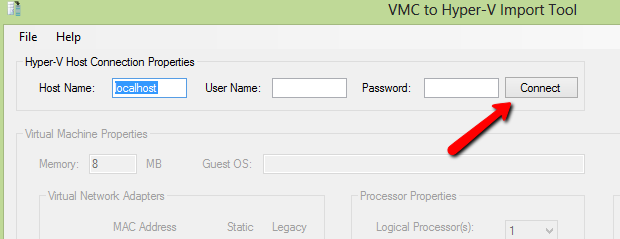
- Download, extract, install and run the tool
- First, press “Connect” to attach to the local Hyper-V instance (if you just installed, then there is no user and password set)
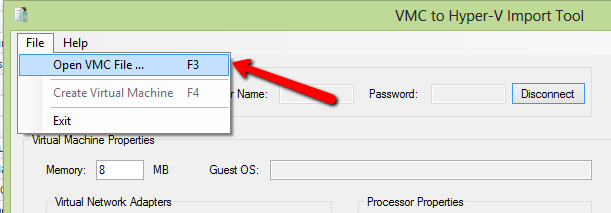
- Next, open the .vmc file for the virtual machine you want to import
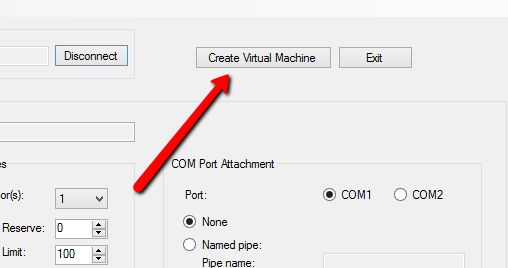
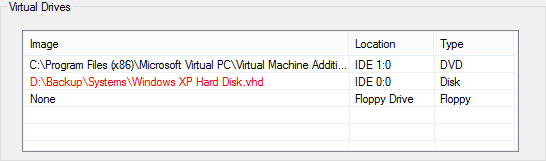
- The settings are loaded into the window; verify that they more-or-less match what you expect.[2]
- Press the “Create Virtual Machine” button to create a new virtual machine in Hyper-V based on those settings.
You’re now ready to configure and start up your virtual machine.
Configuring and Running the VM
There are two things to do to get this machine running smoothly under Hyper-V:
- Set up the network interface
- Install the Integration Services, which includes drivers but essentially makes the mouse work as expected and enables non-legacy networking for guest OSs that support it
There are two kinds of network interface: the standard one and a legacy one. If your guest operating system is Windows XP (as mine was), you have to use the legacy adapter. The documentation also says that a legacy adapter is required to have connectivity without the “Integration Services”.[3]
Install a Legacy Adapter
If you have Windows XP, you can just remove the “Network Adapter” that’s already included and instead install a “Legacy Adapter”.
- From the Hyper-V Manager, select the settings for your machine
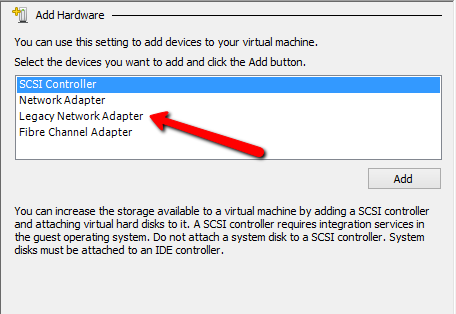
- “Add Hardware” is automatically selected
- Select the “Legacy Network Adapter” and press “Add”
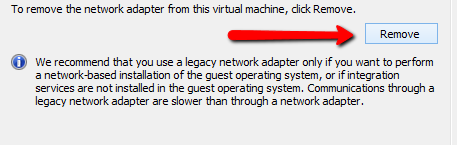
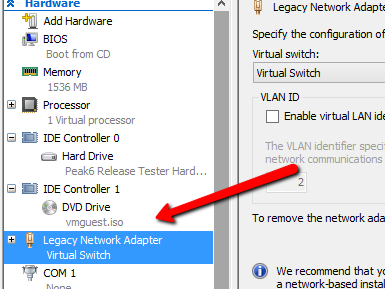
- Select the existing “Network Adapter” in the list on the left to show its settings
- Press the “Remove” button to remove the unneeded “Network Adapter”

You can now set up the network for that adapter, as shown below.
Set up the network
- From the Hyper-V Manager, select the settings for your machine
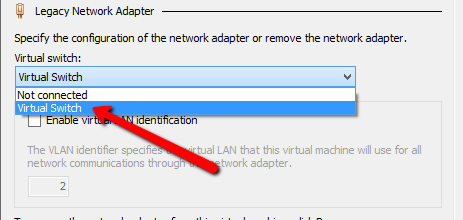
- Select the “Legacy Network Adapter” or “Network Adapter” to show its settings
- Assign the switch (created in a step above) to the network and press OK to save settings
At this point, your virtual machine should be able to connect to the network once it’s started.
Install Integration Services
The machine is not very useful until you’ve installed the integration services. These services enable seamless mouse support and also enable networking over a non-legacy adapter.
- Start the VM
- Wait for the machine to finish booting[4]
- You can’t install the integration services until the previous integration tools have been uninstalled. If your guest OS is Windows XP, uninstall the Virtual PC tools using the “Add/Remove Programs” control panel
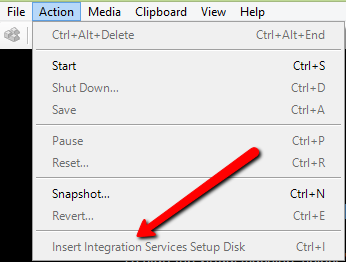
- Once all other tools are uninstalled, select “Insert Integration Services Setup Disk” from the “Action” menu
- After a few seconds, the installation should start automatically
- You’ll have to reboot the guest OS to finish installation.
That’s it! Your Windows XP should once again have full hardware support, including legacy networking (up to 100Mb). Adjust your display settings back up to a usable resolution, re-activate with Microsoft (you have three days) and enjoy your new Hyper-V virtual machine.
[1] It’s an utter mystery why Microsoft couldn’t be bothered to provide an upgrade path from its own product. Perhaps they didn’t want to “officially” support such upgrades in order to kill off as many virtual machines running Windows XP as possible.↩
[2] 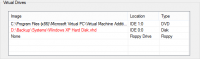 Fix any incorrect pathsIn my case, the path to the main disk image was incorrect and showed up in red. It’s a mystery why that file had such an old path in it, while the VM started with the correct disk image in Virtual PC. At any rate, I adjusted the path to point to the correct disk image, the text turned black and I was allowed to continue.↩
 Fix any incorrect pathsIn my case, the path to the main disk image was incorrect and showed up in red. It’s a mystery why that file had such an old path in it, while the VM started with the correct disk image in Virtual PC. At any rate, I adjusted the path to point to the correct disk image, the text turned black and I was allowed to continue.↩
[3] It’s unclear to me whether network connectivity is required in order to install the integration tools. It took several attempts before the integration services installed successfully. It’s possible that this was due to the unsatisfactory network situation, but I can’t say for sure.↩
[4] And, if you’re using Windows XP as the guest OS, until it has stopped complaining about hardware changes and activation problems↩