Git: Managing local commits and branches
Published by marco on
At Encodo, we’ve got a relatively long history with Git. We’ve been using it exclusively for our internal source control since 2010.[1]
Git Workflows
![]() When we started with Git at Encodo, we were quite cautious. We didn’t change what had already worked for us with Perforce.[2] That is: all developers checked in to a central repository on a mainline or release branch. We usually worked with the mainline and never used personal or feature branches.
When we started with Git at Encodo, we were quite cautious. We didn’t change what had already worked for us with Perforce.[2] That is: all developers checked in to a central repository on a mainline or release branch. We usually worked with the mainline and never used personal or feature branches.
Realizing the limitation of this system, we next adopted an early incarnation GitFlow, complete with command-line support for it. A little while later, we switched to our own streamlined version of GitFlow without a dev branch, which we published in an earlier version of the Encodo Git Handbook.[3]
We’re just now testing the waters of Pull Requests instead of direct commits to master and feature branches. Before we can make this move, though, we need to raise the comfort level that all of our developers have toward creating branches and manipulating commits. We need to take the magic and fear out of Git—but that’s a pushed commit![4]—and learn how to view Git more as a toolbox that we can make for us rather than a mysterious process to whose whims we must comply.[5]
General Rules
Before we get started, let’s lay down some ground rules for working with Git and source control, in general.
- Use branches
- Don’t use too many branches at once
- Make small pull requests
- Use no more than a few unpushed commits
- Get regular reviews
As you can see, the rules describe a process of incremental changes. If you stick to them, you’ll have much less need for the techniques described below. In case of emergency, though, let’s demystify some of what Git does.
If you haven’t done so already, you should really take a look at some documentation of how Git actually works. There are two sources I can recommend:
- The all-around excellent and extremely detailed Official Git Documentation. It’s well-written and well-supplied with diagrams, but quite detailed.
- The Encodo Git Handbook summarizes the details of Git we think are important, as well as setting forth best practices and a development process.
Examples
All examples and screenshots are illustrated with the SmartGit log UI.
Before you do any of the manipulation shown below, always make sure your working tree has been cleared. That means there are no pending changes in it. Use the stash command to put pending changes to the side.
Moving branches
In SmartGit, you can grab any local branch marker and drag it to a new location. SmartGit will ask what you want to do with the dropped branch marker, but you’ll almost always just want to set it to the commit on which you dropped it.
This is a good way of easily fixing the following situation:
- You make a bunch of commits on the master branch
- You get someone to review these local commits
- They approve the commits, but suggest that you make a pull request instead of pushing to
master. A good reason for this might be that both the developer and the face-to-face reviewer think another reviewer should provide a final stamp of approval (i.e. the other reviewer is the expert in an affected area)
In this case, the developer has already moved their local master branch to a newer commit. What to do?
Create a pull-request branch
Create and check out a pull-request branch (e.g. mvb/serviceImprovements).
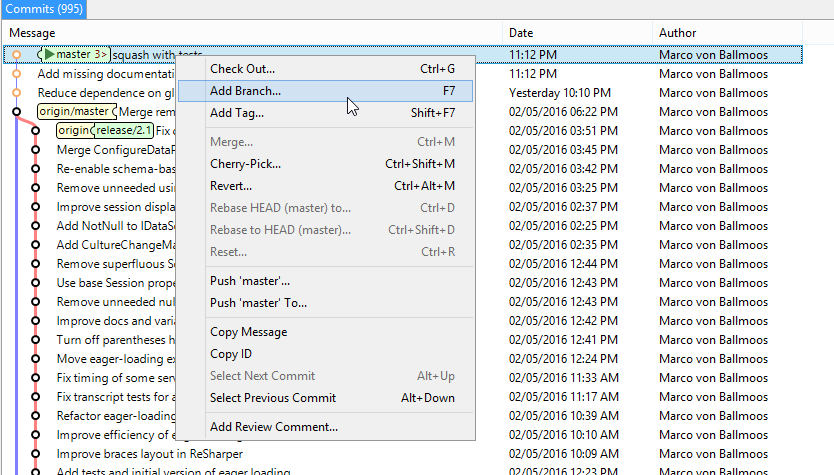 Add branch from the shortcut menu
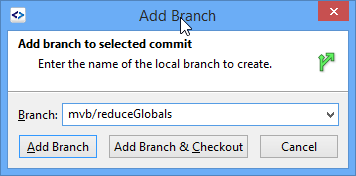
Set master to the origin/master
Move the local master branch back to origin/master. You can do this in two ways:
- Check out the
masterbranch and then reset to theorigin/masterbranch or… - Just drag the local
masterbranch to theorigin/mastercommit.
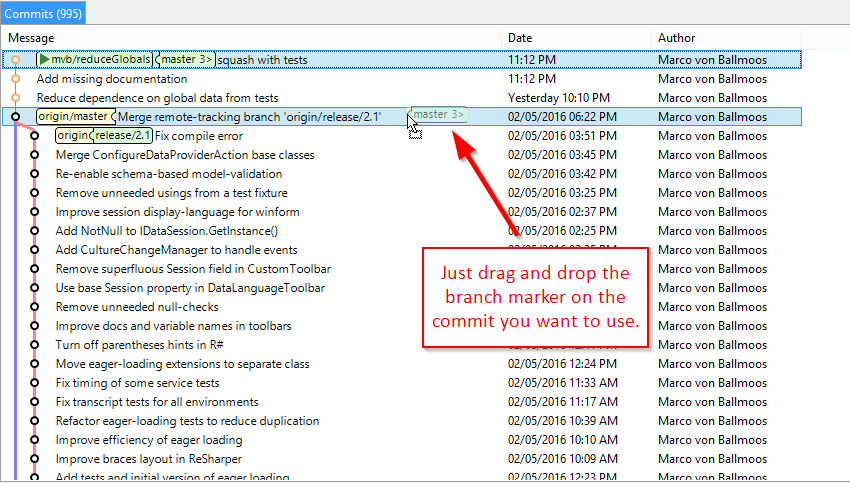
Final: branches are where they belong
In the end, you’ve got a local repository that looks as if you’d made the commits on the pull-request branch in the first place. The master branch no longer has any commits to push.
Moving & joining commits
SmartGit supports drag&drop move for local commits. Just grab a commit and drop it to where you’d like to have it in the list. This will often work without error. In some cases, like when you have a lot of commits addressing the same areas in the same files, SmartGit will detect a merge conflict and will be unable to move the commit automatically. In these cases, I recommend that you either:
- Give up. It’s probably not that important that the commits are perfect.
- Use the techniques outlined in the long example below instead.
You can also “join”—also called “squash” in Git parlance—any adjoining commits into a single commit. A common pattern you’ll see is for a developer to make changes in response to a reviewer’s comments and save them in a new commit. The developer can then move that commit down next to the original commit from which the changes stemmed and join the commits to “repair” the original commit after review. You can at the same time edit the commit message to include the reviewer’s name. Nice, right?
Here’s a quick example:
Initial: three commits
We have three commits, but the most recent one should be squashed with the first one.
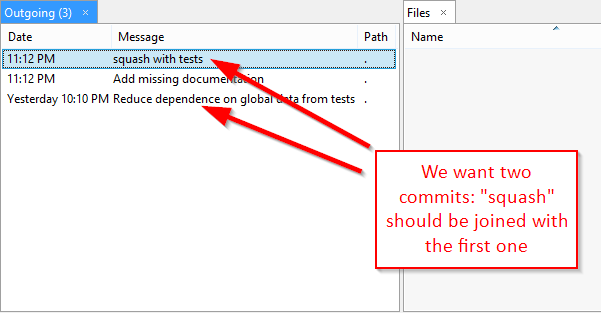 Three commits before moving and squashing
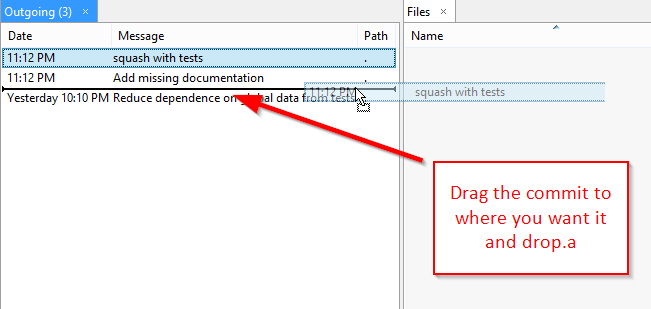
Move a commit
Select the most recent commit and drag it to just above the commit with which you want to join it. This operation might fail.[6]
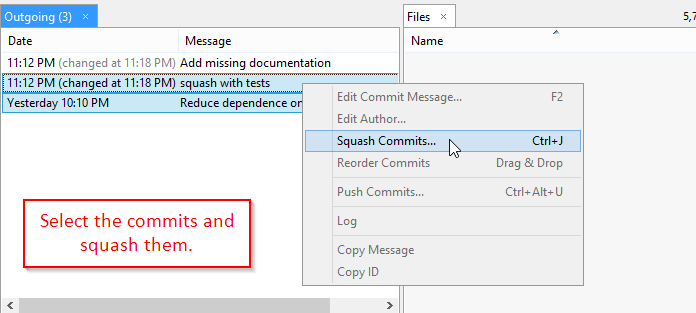
Squash selected commits
Select the two commits (it can be more) and squash/join them. This operation will not fail.
Final: two commits
When you’re done, you should see two commits: the original one has now been “repaired” with the additional changes you made during the review. The second one is untouched and remains the top commit.

Diffing commits
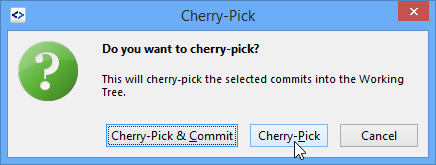
You can squash/join commits when you merge or you can squash/join commits when you cherry-pick. If you’ve got a bunch of commits that you want to combine, cherry-pick those commits but don’t commit them.
You can also this technique to see what has changed between two branches. There are a lot of ways to do this, and a lot of guides will show you how to execute commands on the command line to do this.
In particular, Git allows you to easily display the list of commits between two other commits as well as showing the combined differences in all of those commits in a patch format. The patch format isn’t very easy to use for diffing from a GUI client, though. Most of our users know how to use the command line, but use SmartGit almost exclusively nonetheless—because it’s faster and more intuitive.
So, imagine you’ve made several commits to a feature or release branch and want to see what would be merged to the master branch. It would be nice to see the changes in the workspace as a potential commit on master so you can visually compare the changes as you would a new commit.
Here’s a short, visual guide on how to do that.
Select commits to cherry-pick
Check out the target branch (master in this example) and then select the commits you want to diff against it.
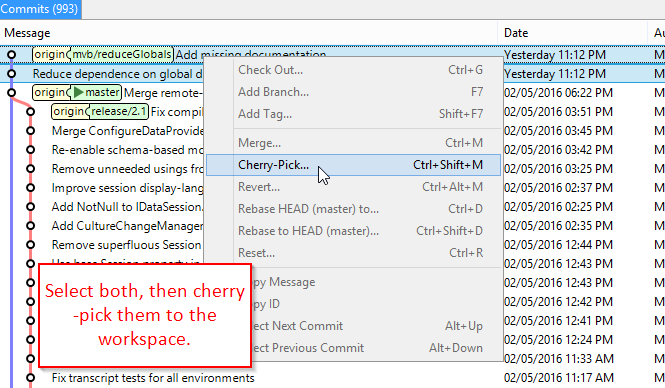 Select the commits to cherry-pick
Do not commit
When you cherry-pick, leave the changes to accumulate in the working tree. If you commit them, you won’t be able to diff en bloc as you’d like.
 Cherry-pick without committing changes
Final: working tree
The working tree now contains the differences in the cherry-picked commits.
 Workspace contains cherry-picked changes
Now you can diff files to your heart’s content to verify the changes.
Working-tree files
Once you have changes in the working tree that are already a part of other commits, you might be tempted to think you have to revert the changes because they’re already committed, right?
You of course don’t have to do that. You can let the original commits die on the vine and make new ones, as you see fit.
Suppose after looking at the differences between our working branch and the master branch, you decide you want to integrate them. You can do this in several ways.
- You could clear the working tree[7], then merge the other branch to
masterto integrate those changes in the original commits. - Or you could create one or more new commits out of the files in the workspace and commit those to
master. You would do this if the original commits had errors or incomplete comments or had the wrong files in them. - Or you could clear the working tree and re-apply the original commits by cherry-picking and committing them. Now you have copies of those commits and you can edit the messages to your heart’s content.
Even if you don’t merge the original commits as in option (1) above, and you create new commits with options (2) and (3), you can still merge the branch so that Git is aware that all work from that branch has been included in master. You don’t have to worry about applying the same work twice. Git will normally detect that the changes to be applied are exactly the same and will merge automatically. If not, you can safely just resolve any merge conflicts by selecting the master side.[8]
An example of reorganizing commits
Abandon hope, all ye who enter here. If you follow the rules outlined above, you will never get into the situation described in this section. That said…when you do screw something up locally, this section might give you some idea of how to get out of it. Before you do anything else, though, you should consider how you will avoid repeating the mistake that got you here. You can only do things like this with local commits or commits on private branches.
The situation in this example is as follows:
- The user has made some local commits and reviewed them, but did not push them.
- Other commits were made, including several merge commits from other pull requests.
- The new commits still have to be reviewed, but the reviewer can no longer sign the commits because they are rendered immutable by the merge commits that were applied afterward.
- It’s difficult to review these commits face-to-face and absolutely unconscionable to create a pull request out of the current local state of the
masterbranch. - The local commits are too confusing for a reviewer to follow.
The original mess
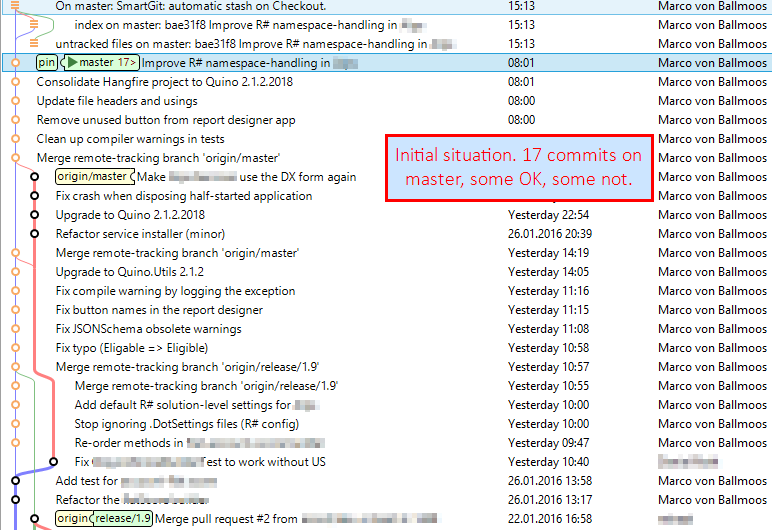
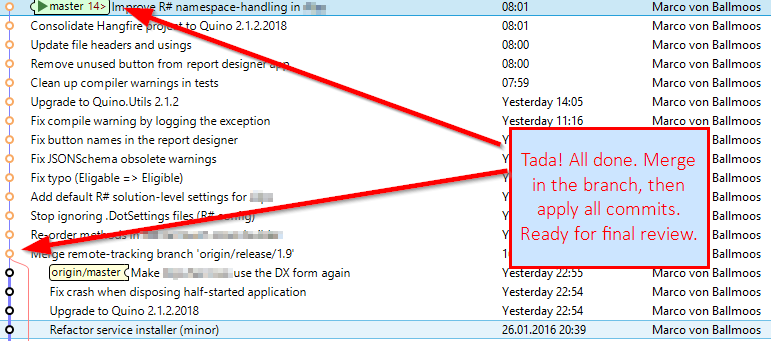
So, let’s get started. The situation to clean up is shown in the log-view below.
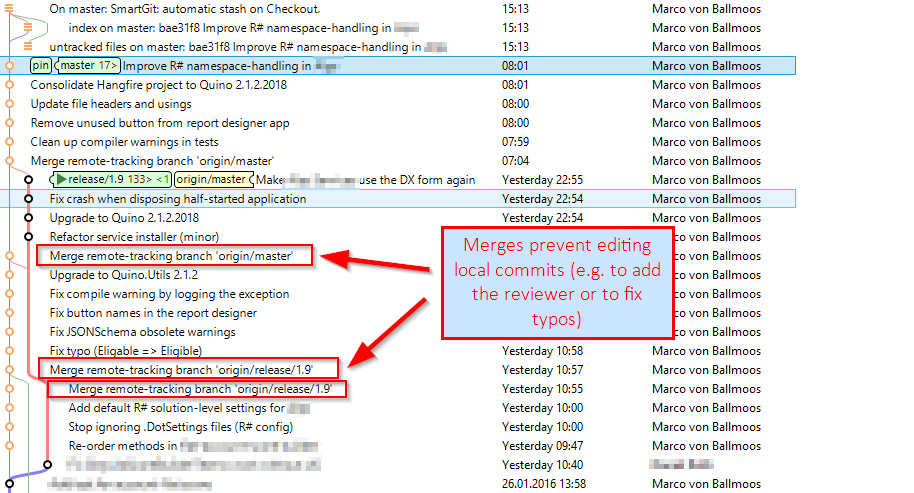 Merge commits prevent editing previous local commits
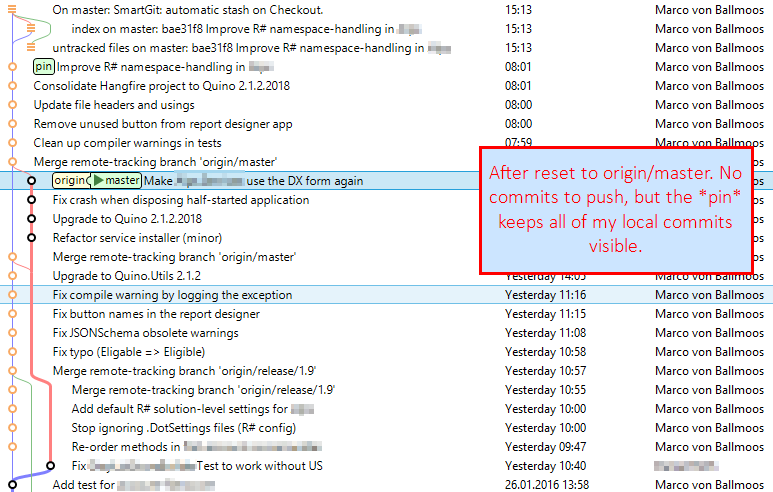
Pin the local commits
Branches in Git are cheap. Local ones even more so. Create a local branch to pin the local commits you’re interested in into the view. The log view will automatically hide commits that aren’t referenced by either a branch or a tag.[9]
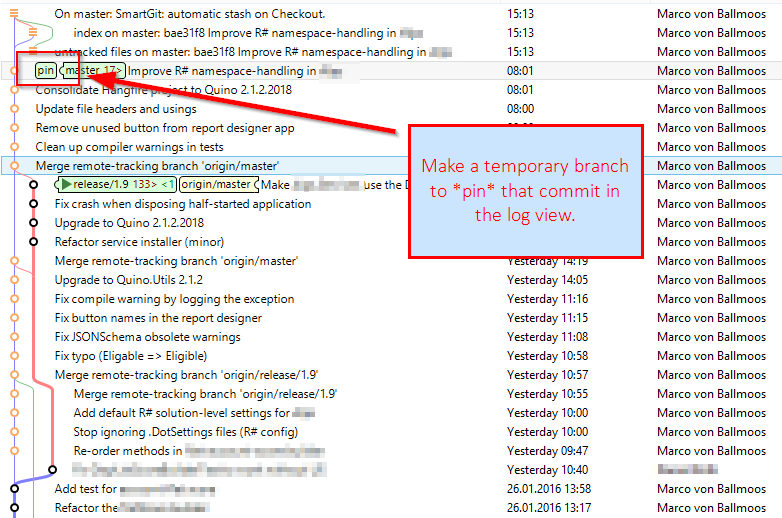 Use temporary branches to pin commits in the view
Choose your commits
Step one: find the commits that you want to save/re-order/merge.
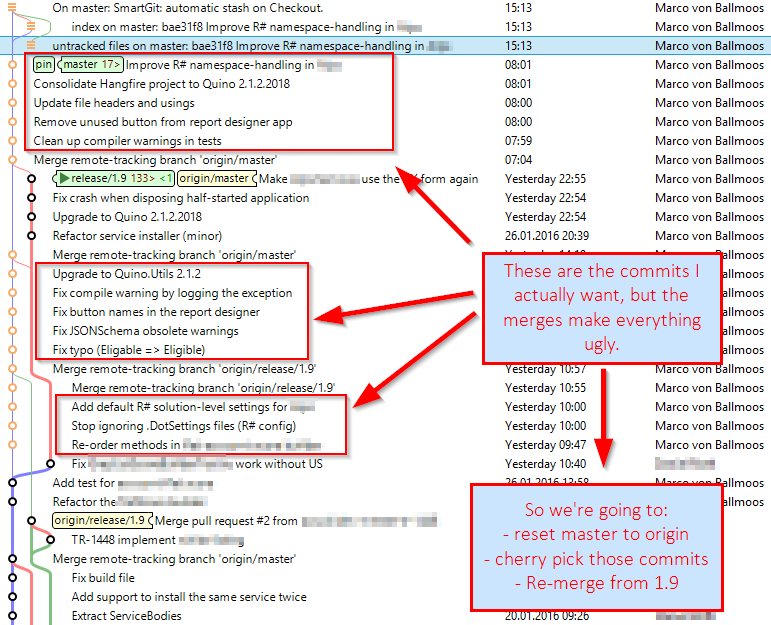 The commits we want to cherry-pick
The diagram below shows the situation without arrows. There are 17 commits we want, interspersed with 3 merge commits that we don’t want.[10]
Reset local master
Check out the master branch and reset it back to the origin.
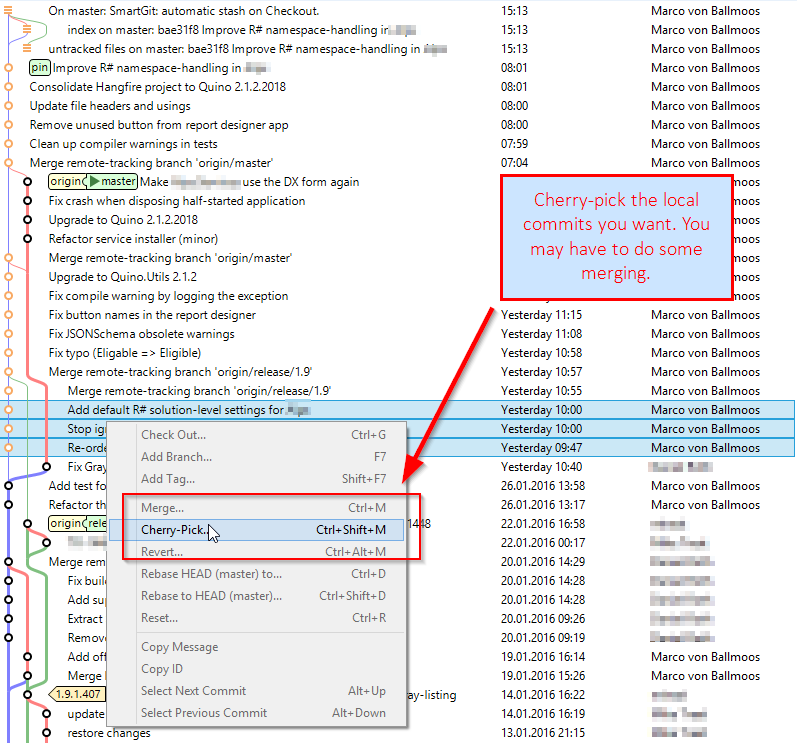
Cherry-pick commits
Cherry-pick and commit the local commits that you want to apply to master. This will make copies of the commits on pin.
Master branch with 17 commits
When you’re done, everything should look nice and neat, with 17 local commits on the master branch. You’re now ready to get a review for the handful of commits that haven’t had them yet.[11]
 Local master includes 17 commits
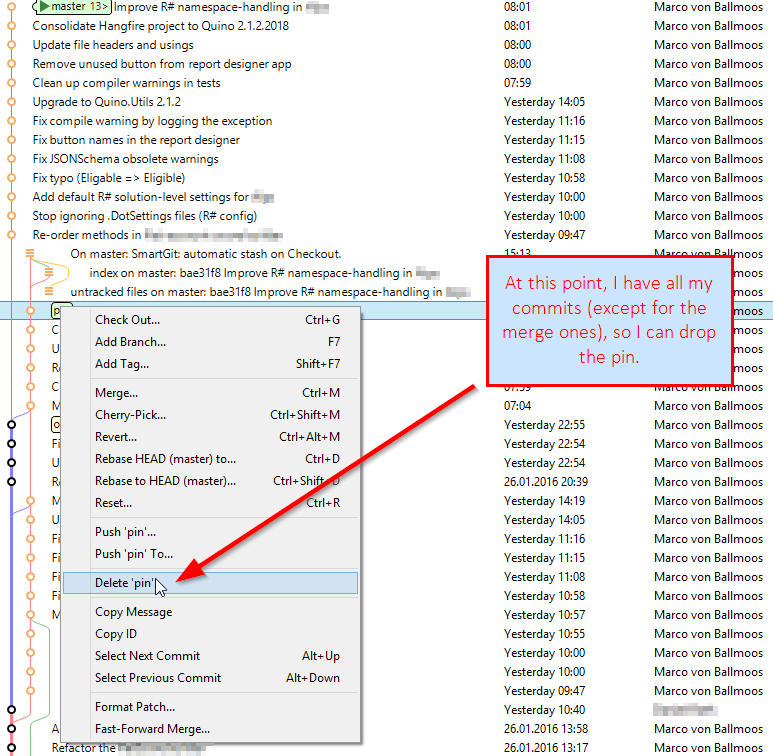
Delete the temporary branch
You now have copies of the commits on your master branch, so you no longer care about the pin branch or any of the commits it was holding in the view. Delete it.
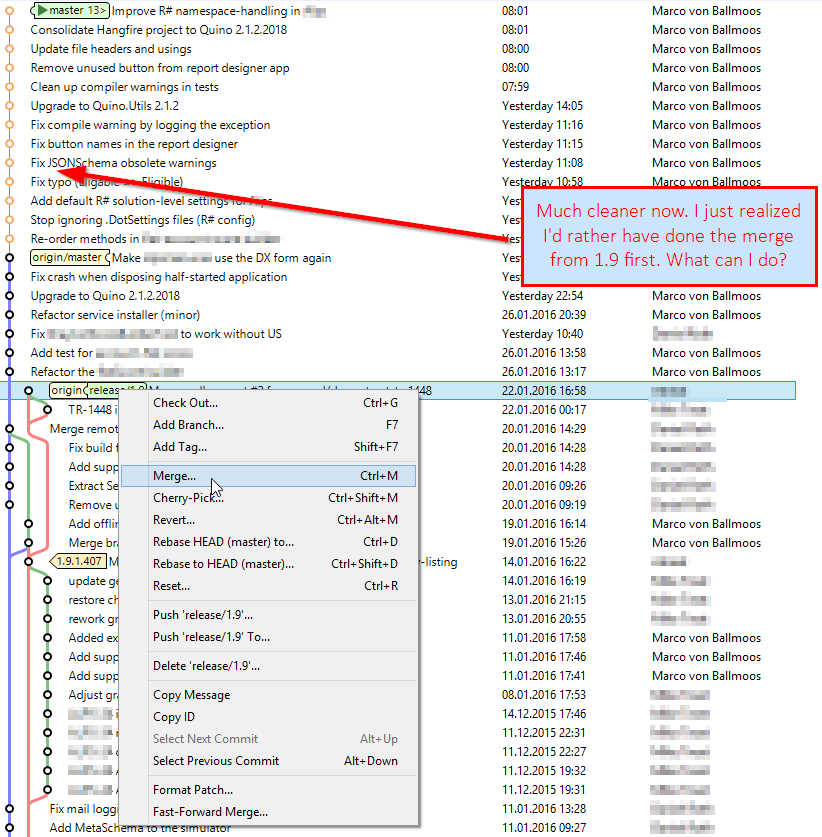
That pesky merge
Without the pin, the old mess is no longer displayed in the log view. Now I’m just missing the merge from the pull request/release branch. I just realized, though: if I merge on top of the other commits, I can no longer edit those commits in any way. When I review those commits and the reviewer wants me to fix something, my hands will be just as tied as they were in the original sitution.
 Inserting a merge commit before local commits
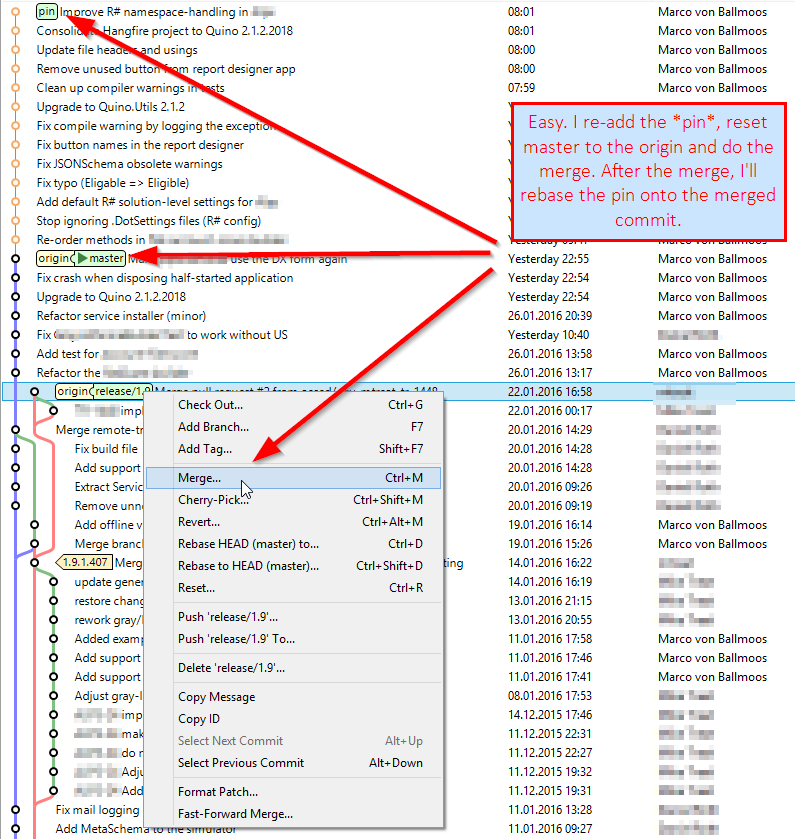
Inserting a commit
If the tools above worked once, they’ll work again. You do not have to go back to the beginning, you do not have to dig unreferenced commits out of the Git reflog.
Instead, you can create the pin branch again, this time to pin your lovely, clean commits in place while you reset the master branch (as before) and apply the merge as the first commit.
Rebase pin onto master
Now we have a local master branch with a single merge commit that is not on the origin. We also have a pin branch with 17 commits that are not on the origin.
Though we could use cherry-pick to copy the individual commits from pin to master, we’ll instead rebase the commits. The rebase operation is more robust and was made for these situations.[12]
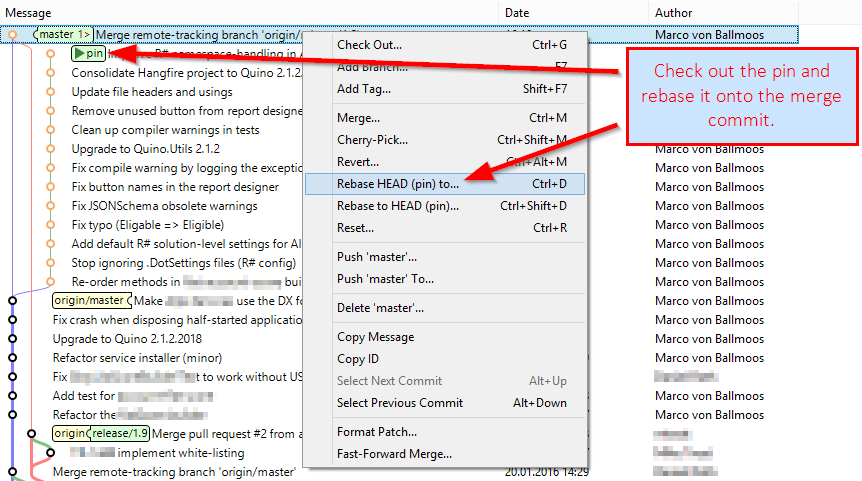
pin is ready
We’re almost done. The pin branch starts with the origin/master, includes a merge commit from the pull request and then includes 17 commits on top of that. These 17 commits can be edited, squashed and changed as required by the review.
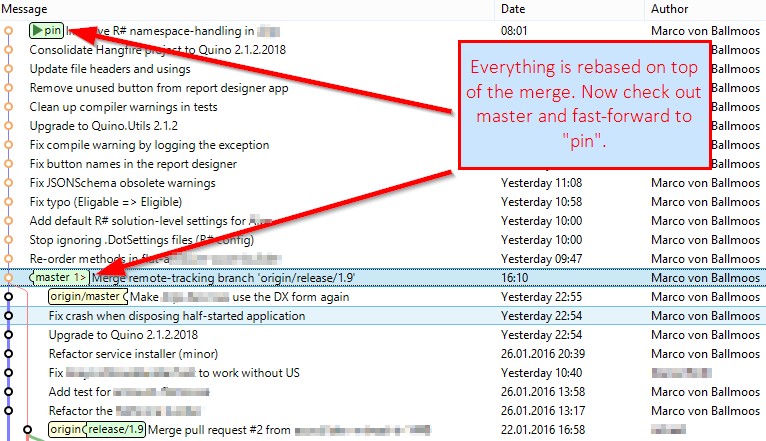 After the rebase, fast-forward local master
Fast-forward master
Now you can switch to the master branch, merge the pin branch (you can fast-forward merge) and then delete the pin branch. You’re done!
 Final: new local commits on top of a merge commit
Conclusion
I hope that helps take some of the magic out of Git and helps you learn to make it work for you rather than vice versa. With just a few simple tools—along with some confidence that you’re not going to lose any work—you can do pretty much anything with local commits.[13]
h/t to Dani and Fabi for providing helpful feedback.
[1] Over five years counts as a long time in this business.↩
[2] I haven’t looked at their product palette in a while. They look to have gotten considerably more enterprise-oriented. The product palette is now split up between the Helix platform, Helix versioning services, Helix Gitswarm and more.↩
[3] But which we’ve removed from the most recent version, 3.0.↩
[4] This is often delivered in a hushed tone with a note of fervent belief that having pushed a commit to the central repository makes it holy. Having pushed a commit to the central repository on
master or a release branch is immutable, but everything else can be changed. This is the reason we’re considering a move to pull requests: it would make sure that commits become immutable only when they are ready rather than as a side-effect of wanting to share code with another developer.↩[5] In all cases, when you manipulate commits—especially merge commits—you should minimally verify that everything still builds and optimally make sure that tests run green.↩
[6] If the commits over which you’re moving contain changes that conflict with the ones in the commit to be moved, Git will not be able to move that commit without help. In that case, you’ll either have to (A) give up or (B) use the more advanced techniques shown in the final example in this blog.↩
[7] That is, in fact, what I did when preparing this article. Since I’m not afraid of Git, I manipulated my local workspace, safe in the knowledge that I could just revert any changes I made without losing work.↩
[8] How do we know this? Because we just elected to create our own commits for those changes. Any merge conflicts that arise are due to the commits you expressly didn’t want conflicting with the ones that you do, which you’ve already committed to
master.↩[9] You can elect to show all commits, but that would then show a few too many unwanted commits lying around as you cherry-pick, merge and rebase to massage the commits to the way you’d like them. Using a temporary branch tells SmartGit which commits you’re interested in showing in the view.↩
[10]
Actually, we do want to merge all changes from the pull-request branch but we don’t want to do it in the three awkward commits that we used as we were working. While it was important at the time that the pull-request be merged in order to test, we want to do it in one smooth merge-commit in the final version.
If you look closely, you can even see two immediately subsequent merges where I merged the branch and committed it. I realized there was a compile error and undid the commit, added the fixes and re-committed. However, the re-commit was no longer a merge commit so Git “forgot” that the pull-request branch had been merged. So I had to merge it again in order to recapture that information.
This is going to happen to everyone who works more than casually with Git, so isn’t it nice to know that you can fix it? No-one has to know.
↩[11] You may be thinking: what if I want to push the commits that have been reviewed to
master and create a pull request for the remaining commits? Then you should take a look in the section above, called Moving branches, where we do exactly that.↩[12] Why? As you saw above, when you cherry-pick, you have to be careful to get the right commits and apply them in the right order. The situation we currently have is exactly what rebase was made for. The rebase command will get the correct commits and apply them in the correct order to the master branch. If there are merge conflicts, you can resolve them with the client and the rebase automatically picks up where you left off. If you elect to cherry-pick the commits instead and the 8th out of 17 commits fails to merge properly, it’s up to you to pick up where you left off after solving the merge conflict. The rebase is the better choice in this instance.↩
[13] Here comes the caveat: within reason. If you’re got merge commits that you have to keep because they cost a lot of blood, sweat and tears to create and validate, then don’t cavalierly throw them away. Be practical about the “prettiness” of your commits. If you really would like commit #9 to be between commits #4 and #5, but SmartGit keeps telling you that there is a conflict when trying to move that commit, then reconsider how important that move is. Generally, you should just forget about it because there’s only so much time you should spend massaging commits. This article is about making Git work for you, but don’t get obsessive about it.↩