How to Expand Your Music Library
There are many online services available these days through which a user can access a vast music library. One of the most popular is the iTunes Music Store, which offers a relatively large library of music for sale. It’s not even DRM-encoded anymore and has thus become more attractive. Amazon also has a pretty extensive library and has offered its music DRM-free from the beginning.
Those are sources where you pay for a license to an MP3 file. You can put it on any many gadgets as you like.
What if you’re at a computer and just want to listen to some music, preferably music you’ve chosen yourself? There are a lot of services out there, with LastFM and Pandora holding quite a large market share between them. A lot of people just type song names into YouTube and watch the video. Recently, however, music search services have sprouted up like mushrooms, sporting Flash-based interfaces and varying levels of usability and library size. These services basically scour the Internet for MP3 files using robots similar to Google’s.
One of the best, Seeqpod, was recently torpedoed by the RIAA and their site has been shut down. They even had a random stream of music from which you could pick song ideas which was a nice way to lose a few hours. Groove Shark is a wonderful replacement, though, with a huge library and a nice playlist function.
I recently ripped a bunch of music from old cassettes (if you don’t know what those are, let me Google that for you). Some of the quality is lacking, what with some of the cassettes being almost 20 years old and the integrity of the magnetic recordings having suffered over the years. So, what to do? Searching on the for-pay music services is mostly useless, as they don’t even offer the music I’m looking for—ignore for now whether this is for reasons of taste or rarity or both—and, whereas LastFM often has references to individual songs, they rarely ever have the actual song, instead inviting me to be the “first to upload it!” GrooveShark, however (and Seeqpod before it) does a remarkably good job of locating the missing/damaged tracks in a decent quality.
Well, that’s kind of cool. You can listen to music anytime you like as long as it doesn’t disappear from the ‘net at some point. You can’t really have this music to load onto your iPod or other music device, can you?
Well, sure you can; you just need a little technical know-how and some patience.
The Flash applet downloads the MP3 file as it plays it, saving it in your browser cache. That file lays around with a weird filename in the browser cache until your browser decides it no longer needs to keep it around and throws it out. That doesn’t usually happen for a while, so the MP3 you want is technically on your hard drive for long enough for you to grab it and copy it somewhere for safe-keeping (i.e. “keeping”).
The following instructions are for my setup: OS X Leopard using the latest Opera browser beta. The principles are likely to apply to other operating systems and browsers, but the location and organization of the cache will differ drastically.[1]
Opera stores its cache in the following folder: ~/Library/Caches/Opera/cache. All of the files in that folder begin with “opr”; you can find the MP3 files by sorting by file-size from largest to smallest and scanning the modification date to see which ones were downloaded most recently. If you sort by modification date, the number of other, smaller files in the cache will spread the larger files over too large an area, making it harder to find them.
Well, that’s how I started out anyway. I’d find the a file I deemed an MP3 candidate and copy it to the side. Of course, without a file extension or useful file-name, it was hard to tell exactly what I had. One way to clear this up is to just drag and drop the files onto iTunes, letting it copy the file to its library and determine whether (A) the file is an MP3 and (B) which song it is. I don’t really like to copy stuff willy-nilly into my music library, though, so I use TriTag to set the file-name from the MP3 ID3 tag information embedded in the song.[2]
So that’s where I started, but I wanted to automate the process at least a little more. I recently installed OS X Leopard, which has a feature called Smart Folders. These are folders whose contents are determined by a search string. You can make a smart folder by simply searching in any Finder window, then clicking the Save button in the top-right corner. To make the search we need, do the following:
- Type Cmd+N to open a new Finder window.
- Type Cmd+F to start a search.
- Type “opr” and select to search “yourname” instead of “This Mac” and “File Name” instead of “Contents”.
At this point, you won’t see the files I’m talking about because the Spotlight feature in OS X Leopard no longer automatically searches your ~/Library (as OS X Tiger did). Despite the storm of complaints about this online, this is a good thing. The search feature is much faster—especially on older hardware, like mine—and searching the ~/Library is still possible. Here’s how:
- From the search window you started above, press the little “+” button next to the “Save” button on the right side of the window.
- From the first drop-down, select “Other”, then find the “System Files” entry in the list in the resulting pop-up window and press the “Ok” button. (hint: there’s a search box in this window as well.)
- From the drop-down next to the one that now says “System Files”, select “include”; now you should see many more files.
- Now, we can restrict further to show only the files that are big enough to be potential MP3 files. press the little “+” button again to add another search argument.
- If the “Size” option is not available from the first drop-down[3], select “Other” again and select it from the pop-up window (as above for “System Files”).
- Set the “Size” option to “is greater than” “2” “MB”; that restricts the list significantly. See the image below for the final result
- Select “Save” from the top-right corner and give your search a name—I cheekily named mine “Downloaded Music”—and you can have the search show up in your sidebar as well.
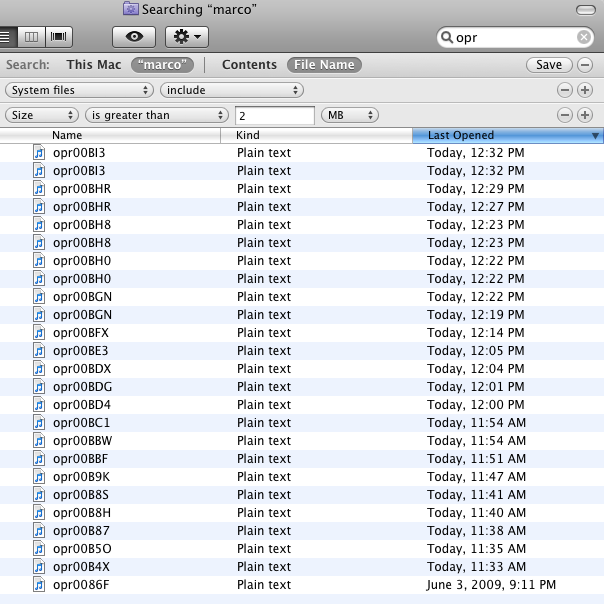 Searching your Opera Cache for MP3s
Now, you can open a Finder window on this smart folder, sorting by date from newest to oldest. As you listen to music in Groove Shark or any other Flash-based music service, you’ll see the potential MP3 files magically appear at the top of the window, from which you can then copy them to a safe place.[4] With a fast connection, the song will be downloaded within the first several seconds of the song; if you’re collecting, you can already copy the file, then go to the next one.
[1] Without going into exacting detail, Windows applications generally store user data under
C:\Documents and Settings\<username>\Application Data\<vendorname>\<applicationname> or C:\Documents and Settings\<username>\Local Settings\Application Data\<vendorname>\<applicationname>. Whereas the Opera cache is a single folder, the Safari cache is a vast tree of numbered folders within which it’s difficult to locate anything reliably, though the search-based approach is likely to work there as well. Firefox’s cache is also a single folder, IIRC.↩[2] TriTag doesn’t recognize files without the MP3 extension, so you have to add the extension to each file. If you’ve got a lot of them, the Finder asking you whether you’re sure you want to add the extension gets a little old after the second time or so. To get around this hassle, use the Terminal and execute the following script from the command-line:
for i in opr*; do mv $i $i.mp3; done. Now, you can drag them into TriTag and have it rename them. You can probably automate this further, but I drew the line there.↩[3] For any of these options, you can set the “In Menu” check-box from the popup-window to make it available on the initial drop-down menu.↩
[4] Again, if you’re interested in an assembly line feature where you just basically keep a copy of everything you’ve heard through your browser, you can automate further with Apple Scripts and/or the Automator application. Indeed, you could make a script that copied files from the cache to a separate folder, renaming them using the ID3-tag information as it did so. But that I leave as an exercise for the reader.↩