Schema migration in Quino 1.13
Published by marco on
Quino is a metadata framework for .NET. It provides a means of defining an application-domain model in the form of metadata objects. Quino also provides many components and support libraries that work with that metadata to automate many services and functions. A few examples are an ORM, schema migration, automatically generated user interfaces and reporting tools.
The schema-migration tool
The component we’re going to discuss is the automated schema-migration for databases. A question that recently came up with a customer was: what do all of the options mean in the console-based schema migrator?
Here’s the menu you’ll see in the console migrator:
Advanced Options
(1) Show migration plan
(2) Show significant mappings
(3) Show significant mappings with unique ids
(4) Show all mappings
(5) Show all mappings with unique ids

Main Options
(R) Refresh status
(M) Migrate database
(C) Cancel
The brief summary is:
- The only action that actually makes changes is (M)
- Option (1) is the only advanced option you will every likely use; use this to show the changes that were detected
The other advanced options are more for debugging the migration recommendation if something looks wrong. In order to understand what that means, we need to know what the migrator actually does.
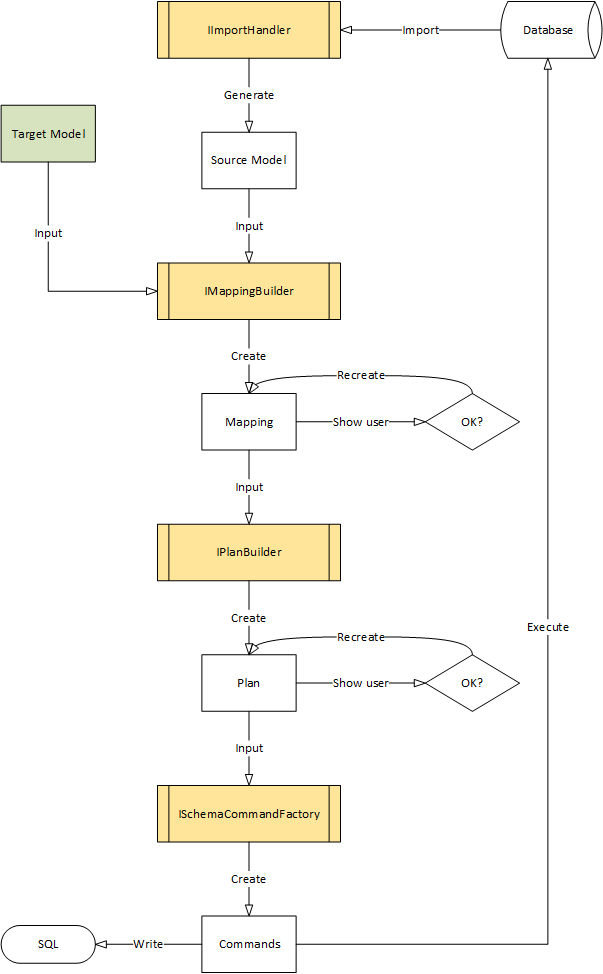 Schema migration overview
- Provide the application model as input
- Import a model from the database as input
- Generate a mapping between the two models
- Create a migration plan to update the database to reflect the application model
- Generate a list of commands that can be applied to the database to enact the plan
- Execute the commands against the database
The initial database-import and final command-generation parts of migration are very database-specific. The determination of differences is also partially database-specific (e.g. some databases do not allow certain features so there is no point in detecting a difference that cannot ever be repaired). The rest of the migration logic is database-independent.
Gathering data for migration
The migrator works with two models: the target model and a source model
- The target model is provided as part of the application and is usually loaded from a core assembly. The source model is imported from the database schema by the “import handler”
Given these two models, the “mapping builder” creates a mapping. In the current implementation of Quino, there is no support for allowing the user to adjust mapping before a migration plan is built from it. However, it would be possible to allow the user to verify and possibly adjust the mapping. Experience has shown that this is not necessary. Anytime we thought we needed to adjust the mapping, the problem was instead that the target model had been configured incorrectly. That is, each time we had an unexpected mapping, it led us directly to a misconfiguration in the model.
The options to show mappings are used to debug exactly such situations. Before we talk about mapping, though, we should talk about what we mean by “unique ids”. Every schema-relevant bit of metadata in a Quino model is associated with a unique id, in the form of a Guid and called a “MetaId” in Quino.
Importing a model from a database
What happens during when the import handler generates a model?
The importer runs in two phases:
- Extract the “raw model” from the database schema
- Enhance the “raw model” with data pulled from the application-specific Quino metadata table in the same database
A Quino application named “demo” will have the following schema:
- All modeled tables are named “demo__*”
- The metadata table is named “demometadata__elementdescription”
The migrator reads the following information into a “raw model”
- Tables => MetaClasses
- Fields/Columns => MetaProperties
- Indexes => MetaIndexes
- Foreign Keys => MetaPaths
If there is no further information in the database, then the mapper will have to use the raw model only. If, however, the database was created or is being maintained by Quino, then there is additional information stored in the metadata table mentioned above. The importer enhanced the raw model with this information, in order to improve mapping and difference-recognition. The metadata table contains all of the Quino modeling information that is not reflected in a standard database schema (e.g. the aforementioned MetaId).
The data available in this table is currently:
- SchemaIdentifier: the identifier used in the raw model/database schema
- Identifier: the actual identifier of the metadata element that corresponds to the element identified by the
SchemaIdentifier - MetaId: the unique id for the metadata element
- ObjectType: the type of metadata (one of: class, property, index, path, model)
- ParentMetaId: the unique id of the metadata element that is the logical parent of this one; only allowed to be empty for elements with ObjectType equal to “model”
- Data: Custom data associated with the element, as key/value pairs
- DataVersion: Identifies the format type of the “Data” element (1.0.0.0 corresponds to CSV)
For each schema element in the raw model, the importer does the following:
- Looks up the data associated with that SchemaIdentifier and ObjectType (e.g. “punchclock__person” and “class”)
- Updates the “Identifier”
- Sets the “MetaId”
- Loads the key/value pairs from the Data field and applies that data to the element
Generating a mapping
At this point, the imported model is ready and we can create a mapping between it and the application model. The imported model is called the source model while the application model is called the target model because we’re migrating the “source” to match the “target”.
We generate a mapping by iterating the target model:
- Find the corresponding schema element in the source model using MetaIds[1]
- If an element can be found, create a mapping for those two elements
- If no element can be found, create a mapping with the target element. This will cause the element to be created in the database.
- For all elements in the source model that have no corresponding element in the target model, create a mapping with only the source element. This will cause the element to be dropped from the database.
Creating a migration plan
The important decisions have already been made in the mapping phase. At this point, the migrator just generates a migration plan, which is a list of differences that must be addressed in order to update the database to match the target model.
- If the mapping has a source and target elementIf the mapping has only a source, generate a difference that the element is unneeded and should be dropped.
- Create a difference if the element has been renamed
- Create a difference if the element has been altered (e.g. a property has a different type or is now nullable; an index has new properties or is no longer unique; etc.)
- If the mapping has only a target, generate a difference that the element is missing and should be created.
This is the plan that is shown to the user by the various migration tools available with Quino.[2]
The advanced console-migrator commands
At this point, we can now understand what the advanced console-migrator commands mean. Significant mappings are those mappings which correspond to a difference in the database (create, drop, rename or alter).
- Show significant mappings: show significant mappings to see more detail about the names on each side
- Show significant mappings with unique ids: same as above, but also include the MetaIds for each side. Use this to debug when you suspect that you might have copy/pasted a MetaId incorrectly or inadvertently moved one.
- Show all mappings: Same detail level as the first option, but with all mappings, including those that are 100% matches
- Show all mappings with unique ids: same as above, but with MetaIds
As already stated, the advanced options are really there to help a developer see why the migrator might be suggesting a change that doesn’t correspond to expectations.
Generating commands for the plan
At this point, the migrator displays the list of differences that will be addressed by the migrator if the user chooses to proceed.
What happens when the user proceeds? The migrator generates database-specific commands that, when executed against the database, will modify the schema of the database.[3]
Commands are executed for different phases of the migration process. The phases are occasionally extended but currently comprise the following.
- Initialize: perform any required initialization before doing anything to the schema
- DropConstraintsAndIndexes: drop all affected constraints and indexes that would otherwise prevent the desired modification of the elements involved in the migration.
- AddUpdateOrRenameSchema: Create new tables, columns and indexes and perform any necessary renaming. The changes in this phase are non-destructive
- UpdateData: Perform any necessary data updates before any schema elements are removed. This is usually the phase in which custom application code is executed, to copy existing data from other tables and fields before they are dropped in the next phase. For example, if there is a new required 1–1 relation, the custom code might analyze the other data in the rows of that table to determine which value that row should have for the new foreign key.
- DropSchema: Drop any unneeded schema elements and data
- CreatePrimaryKeys: Create primary keys required by the schema. This includes both new primary keys as well as reestablishing primary keys that were temporarily dropped in the second phase.
- CreateConstraintsAndIndexes: Create constraints and indexes required by the schema. This includes both new constraints and indexes as well as reestablishing constraints and indexes that were temporarily dropped in the second phase.
- UpdateMetadata: Update the Quino-specific metadata table for the affected elements.
Executing the migration plan
The commands are then executed and the results logged.
Afterward, the schema is imported again, to verify that there are no differences between the target model and the database. In some (always rarer) cases, there will still be differences, in which case, you can execute the new migration plan to repair those differences as well.
In development, this works remarkably well and often, without further intervention.
Fixing failed migrations
In some cases, there is data in the database that, while compatible with the current database schema, is incompatible with the updated schema. This usually happens when a new property or constraint is introduced. For example, a new required property is added that does not have a default value or a new unique index is added which existing data violates.
In these cases, there are two things that can be done:
- Either the database data is cleaned up in a way that makes it compatible with the target schema[4]
- Or the developer must add custom logic to the metadata elements involved. This usually means that the developer must set a default value on a property. In rarer cases, the developer must attach logic to the affected metadata (e.g. the property or index that is causing the issue) that runs during schema migration to create new data or copy it from elsewhere in order to ensure that constraints are satisfied when they are reestablished at the end of the migration.
In general, it’s strongly advised to perform a migration against a replica of the true target database (e.g. a production database) in order to guarantee that all potential data situations have been anticipated with custom code, if necessary.
Quino Migration versus EF Migrations
It’s important to point out that Quino’s schema migration is considerably different from that employed by EF (which it picked up from the Active Migrations in Ruby, often used with Ruby on Rails). In those systems, the developer generates specific migrations to move from one model version to another. There is a clear notion of upgrading versus downgrading. Quino only recognizes migrating from an arbitrary model to another arbitrary model. This makes Quino’s migration exceedingly friendly when moving between development branches, unlike EF, whose deficiencies in this area have been documented.
[1] The default is to use only MetaIds. There is a mode in which identifiers are used as a fallback but it is used only for tools that import schemas that were not generated by Quino. Again, if the Quino metadata table hasn’t been damaged, this strict form of mapping will work extremely well.↩
[2] The Winform and Web user interfaces for Quino both include built-in feedback for interacting with the schema migration. There are also two standalone tools to migrate database schemas: a Winform application and a Windows console application.↩
[3] The form of these commands is currently a mix of SQL and custom C# code. A future feature of the migration will be to have all commands available as SQL text so that the commands, instead of being executed directly, could be saved as a file and reviewed and executed by DBAs instead of letting the tool do it. We’re not quite there yet, but proceeding nicely.↩
[4] This is generally what a developer does with his or her local database. The data contained therein can usually be more or less re-generated. If there is a conflict during migration, a developer can determine whether custom code is necessary or can sometimes determine that the data situation that causes the problem isn’t something that comes up in production anyway and just remove the offending elements or data until the schema migration succeeds.↩