“Stealing” music with an iPod
Published by marco on
Apple has bowed to industry pressure and crippled their music device, the iPod. Each iPod has one “home” machine with which it stays automatically synchronized. Once you’ve connected the iPod (and only then), you can change on-board settings that control whether this happens automatically for all songs, for just selected playlists (useful if your library is larger than the iPod’s capacity) or not at all. If you select the manual mode of music transfer, iTunes and iPod still enforce moving songs in only one direction, onto the iPod. Therefore if you’ve got two Macintoshes and you thought the iPod would be a nice portable hard drive to keep your libraries synchronized, well, you’ve bought yourself $400 worth of piracy management courtesy of Hollywood.
If you’d like to move files from the iPod to another machine, it can be done. It’s just not that easy or straightforward.
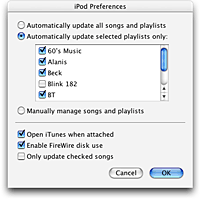 First of all, you should make sure the iPod isn’t synchronizing automatically. Connect the iPod to the current “home” machine and click the iPod icon that appears on the left panel in iTunes. On the bottom right hand side of the iTunes window, an iPod button should appear. Click it to bring up the iPod preferences window. Click the “Manually manage songs and playlists” radio button and click “OK”. If you don’t have access to the home machine, move on to the next step anyway.
- The second thing to do is to attach the iPod to the destination machine without it erasing your files. Connect the iPod to the new machine and say “no” when it asks you if you’d like to make the new machine your “home” machine and erase all files off of the iPod, synchronizing it with the new machine. At this point, you should see the iPod on the desktop. If you don’t, go to step one and set the iPod to manual update mode.
- Open the iPod hard drive and you’ll see some files, but you won’t see any mp3 files. That’s because they’re hidden.
- The next thing you need to do is see all of the invisible files on the iPod. TinkerTool X is a nice utility that installs into System Preferences and lets you do just that. Click the checkbox to “view hidden and system files” and restart the finder. Now you should be able to see the hidden folders.
- Inside the “iPod_Control” folder, there are a lot of “F##” folders. These contain all of your mp3s. Copy them all to the local hard drive.
- Next, you need to unhide the files in order for iTunes to be able to see them. Here’s where a nice tool called File Buddy comes in. Download and install this tool in order to unhide all the folders. From File Buddy, select to open a folder and select all of the folders starting with “F##”. In the bottom right, File Buddy should note that these folders are “Invisible”. Uncheck this box and apply the changes.
- To get iTunes to organize your music for you, make sure that the “Advanced” preferences in iTunes specify that songs added to the library are copied into your music folder.
- Finally, drag all of the folders onto iTunes. It will add the songs to your library.
- Delete the F## folders from your hard drive after iTunes is done copying them.
You’re done copying the library from your iPod. You can also now change the setting back on the iPod to automatically update with that machine as your “home” computer, if you like. You can also use TinkerTools to hide all hidden and system files again.